> ## Documentation Index
> Fetch the complete documentation index at: https://docs.monieswitch.com/llms.txt
> Use this file to discover all available pages before exploring further.
# Payment links
> Learn how to use payment links to easily collect payments from your customers
Payment links let you collect payments from anyone, anywhere, with a
simple link—no code or integration required. Create, share, and track payment
links from your dashboard or via API.
 ***
## Payment Link Lifecycle
```mermaid theme={"system"}
flowchart LR
A[Create Payment Link] --> B[Share Link]
B --> C[Customer Pays]
C --> D[Receive Payment]
D --> E[Track & Manage Link]
```
***
***
## Payment Link Lifecycle
```mermaid theme={"system"}
flowchart LR
A[Create Payment Link] --> B[Share Link]
B --> C[Customer Pays]
C --> D[Receive Payment]
D --> E[Track & Manage Link]
```
***
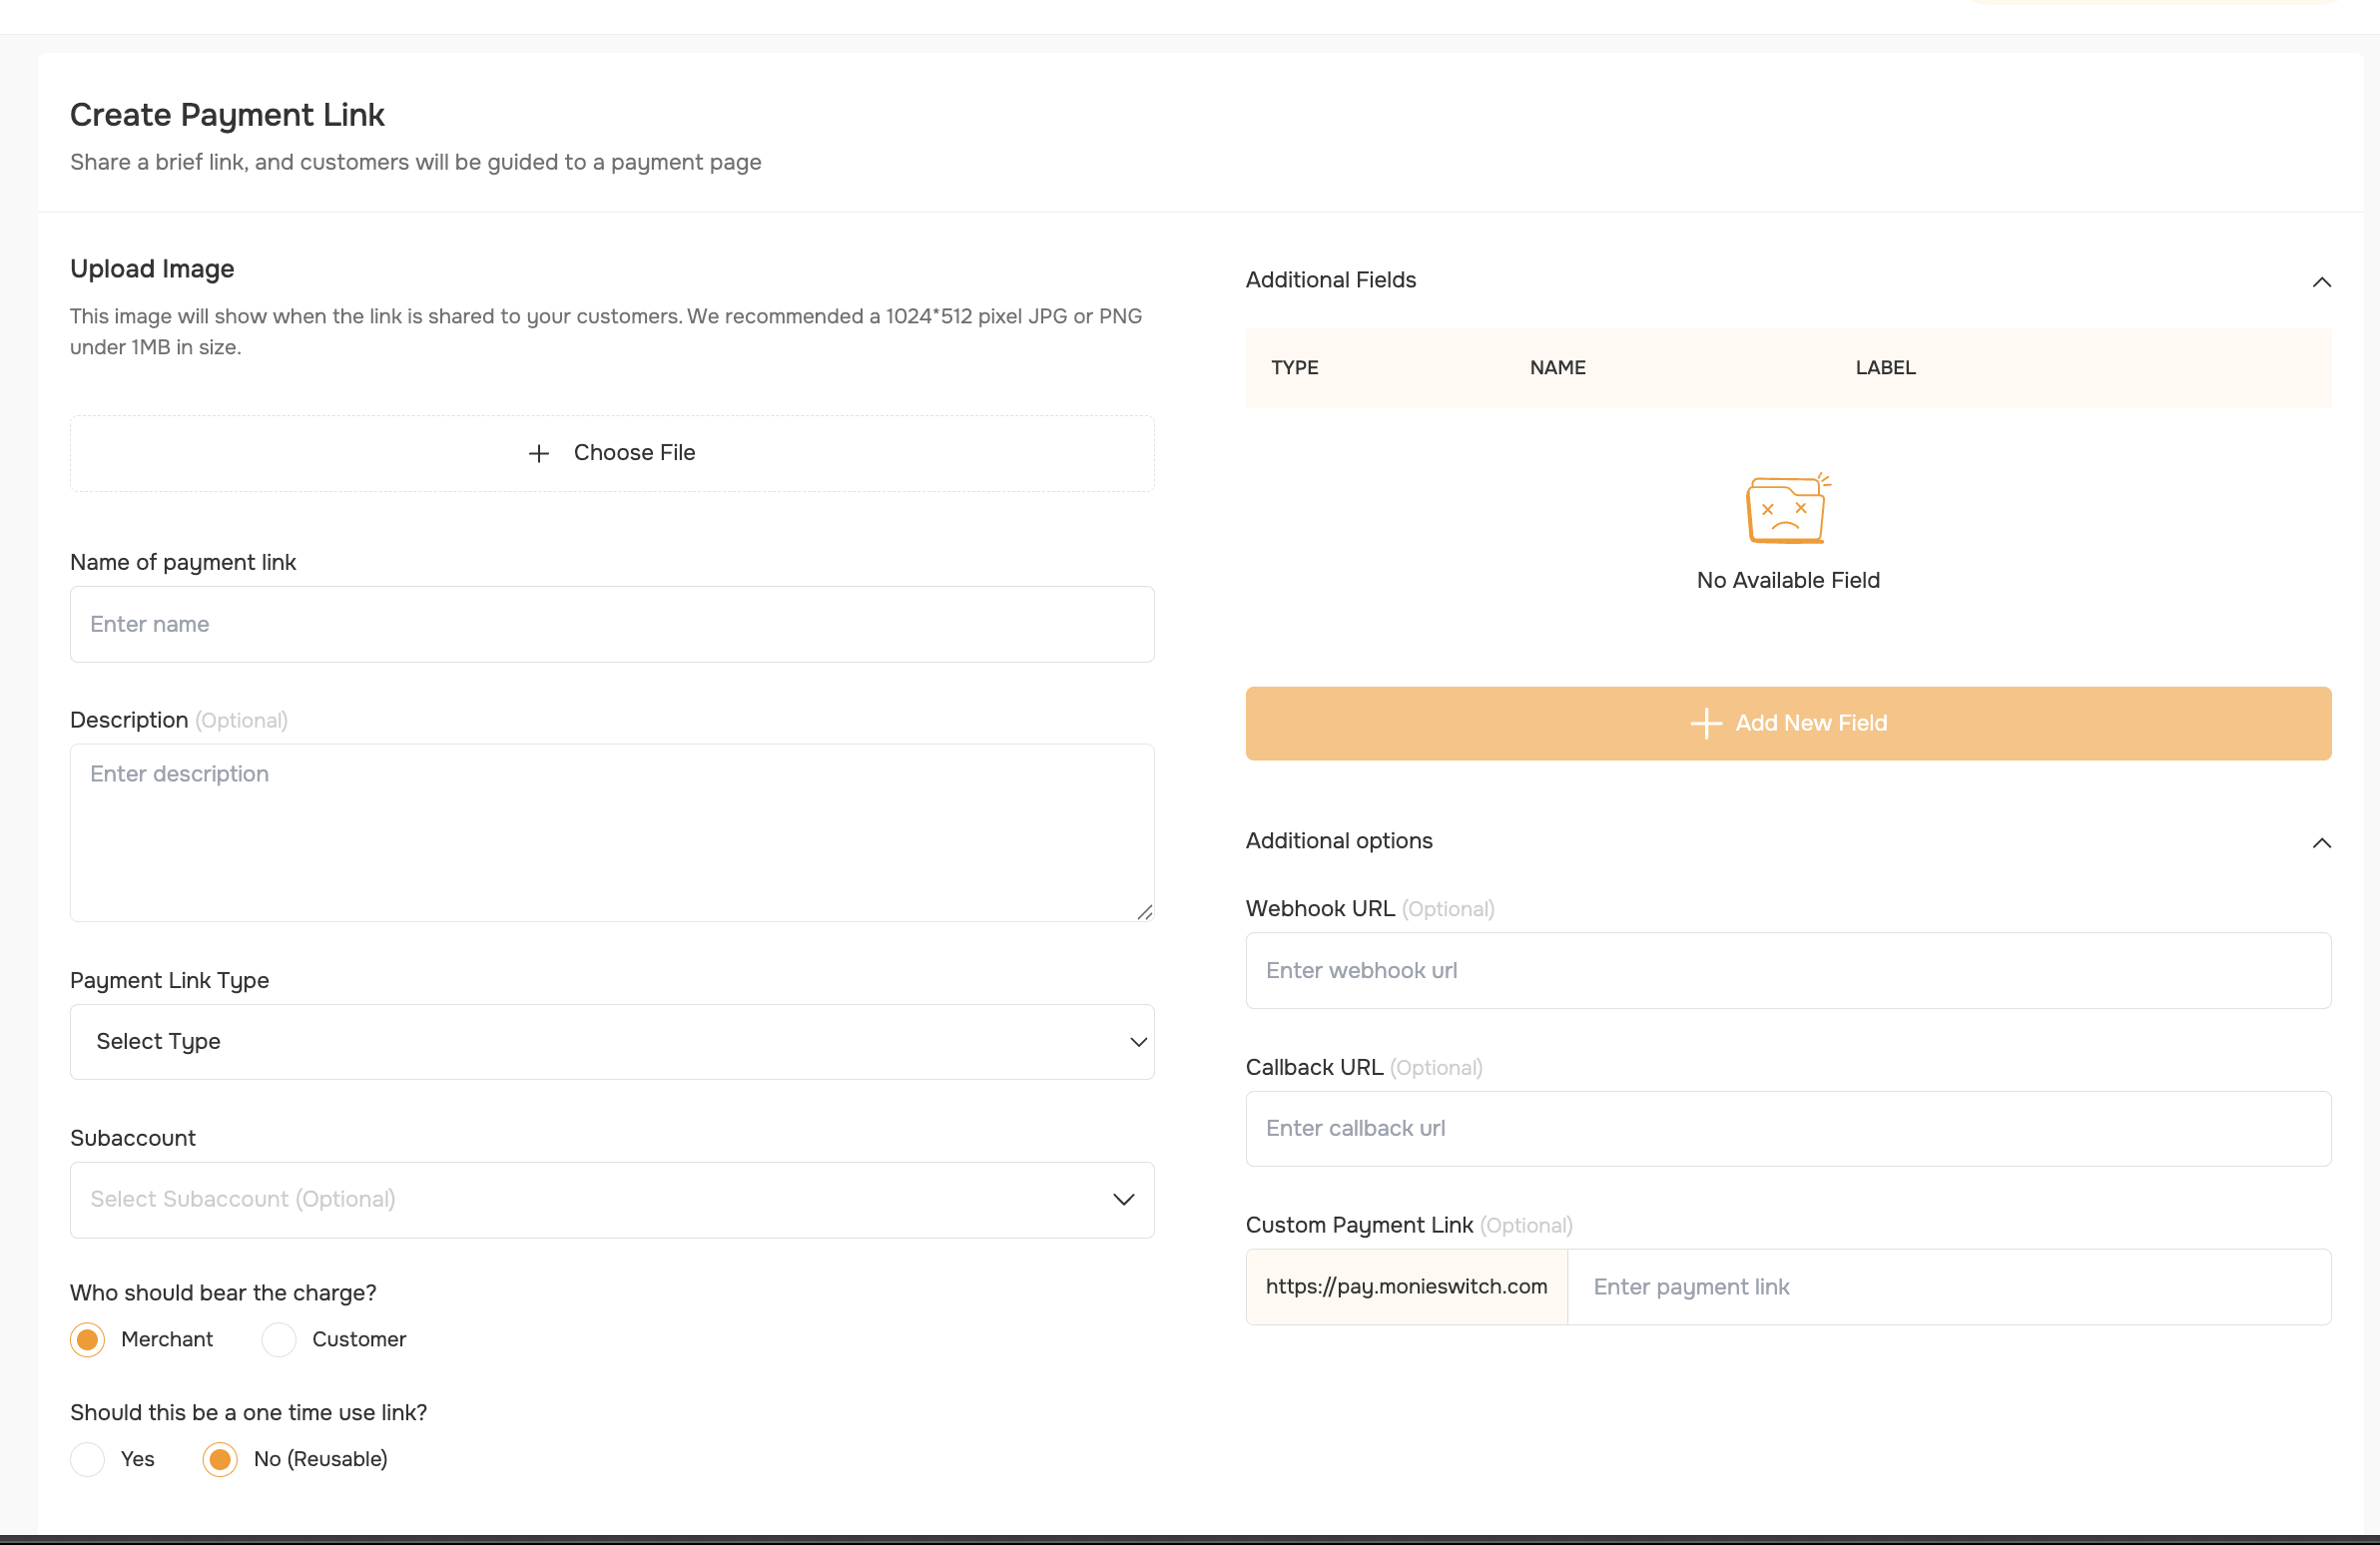
- Purpose: This image displays when the link is shared with customers
- Recommended specs: 1024×512 pixel JPG or PNG under 1MB
- How to: Click "Choose File" to upload your image
- Best practice: Use your business logo or product image for brand recognition
- Field: "Name of payment link"
- Purpose: Internal reference and customer-facing title
- Example: "Monthly Subscription", "Product Purchase", "Service Fee"
- Tip: Use clear, descriptive names that customers will recognize
- Purpose: Provides additional context about the payment
- Best practice: Include details about what the customer is paying for
- Example: "Monthly subscription for premium features" or "One-time setup fee"
```mermaid theme={"system"}
flowchart LR
A2[Payment Link]
A2 --> A2a[Fixed]
A2 --> A2b[Custom]
A2 --> A2c[Input]
A2 --> A2d[Dropdown]
```
Choose the type that fits your use case:
| Type | When to Use | Customer Experience | Example |
| ---------------------- | ----------------------- | ------------------------------------- | ------------------------------------- |
| **Fixed Amount** | Set price | Customer pays a specific amount | ₦5,000 monthly subscription |
| **Custom Amount** | Flexible payments | Customer enters any amount | Donations, tips |
| **Input Amount** | Guided input | Customer specifies amount with prompt | "Pay what you owe" scenarios |
| **Dropdown Selection** | Multiple preset options | Customer selects from dropdown | ₦2,000, ₦5,000, ₦10,000 service tiers |
- Purpose: Route payments to specific business accounts
- How to: Select from dropdown if you have multiple subaccounts
- Note: Only appears if you have subaccounts configured
Additional fields let you collect extra information from your customer during payment (e.g., phone number, delivery address, preferences).
When you click + Add New Field:
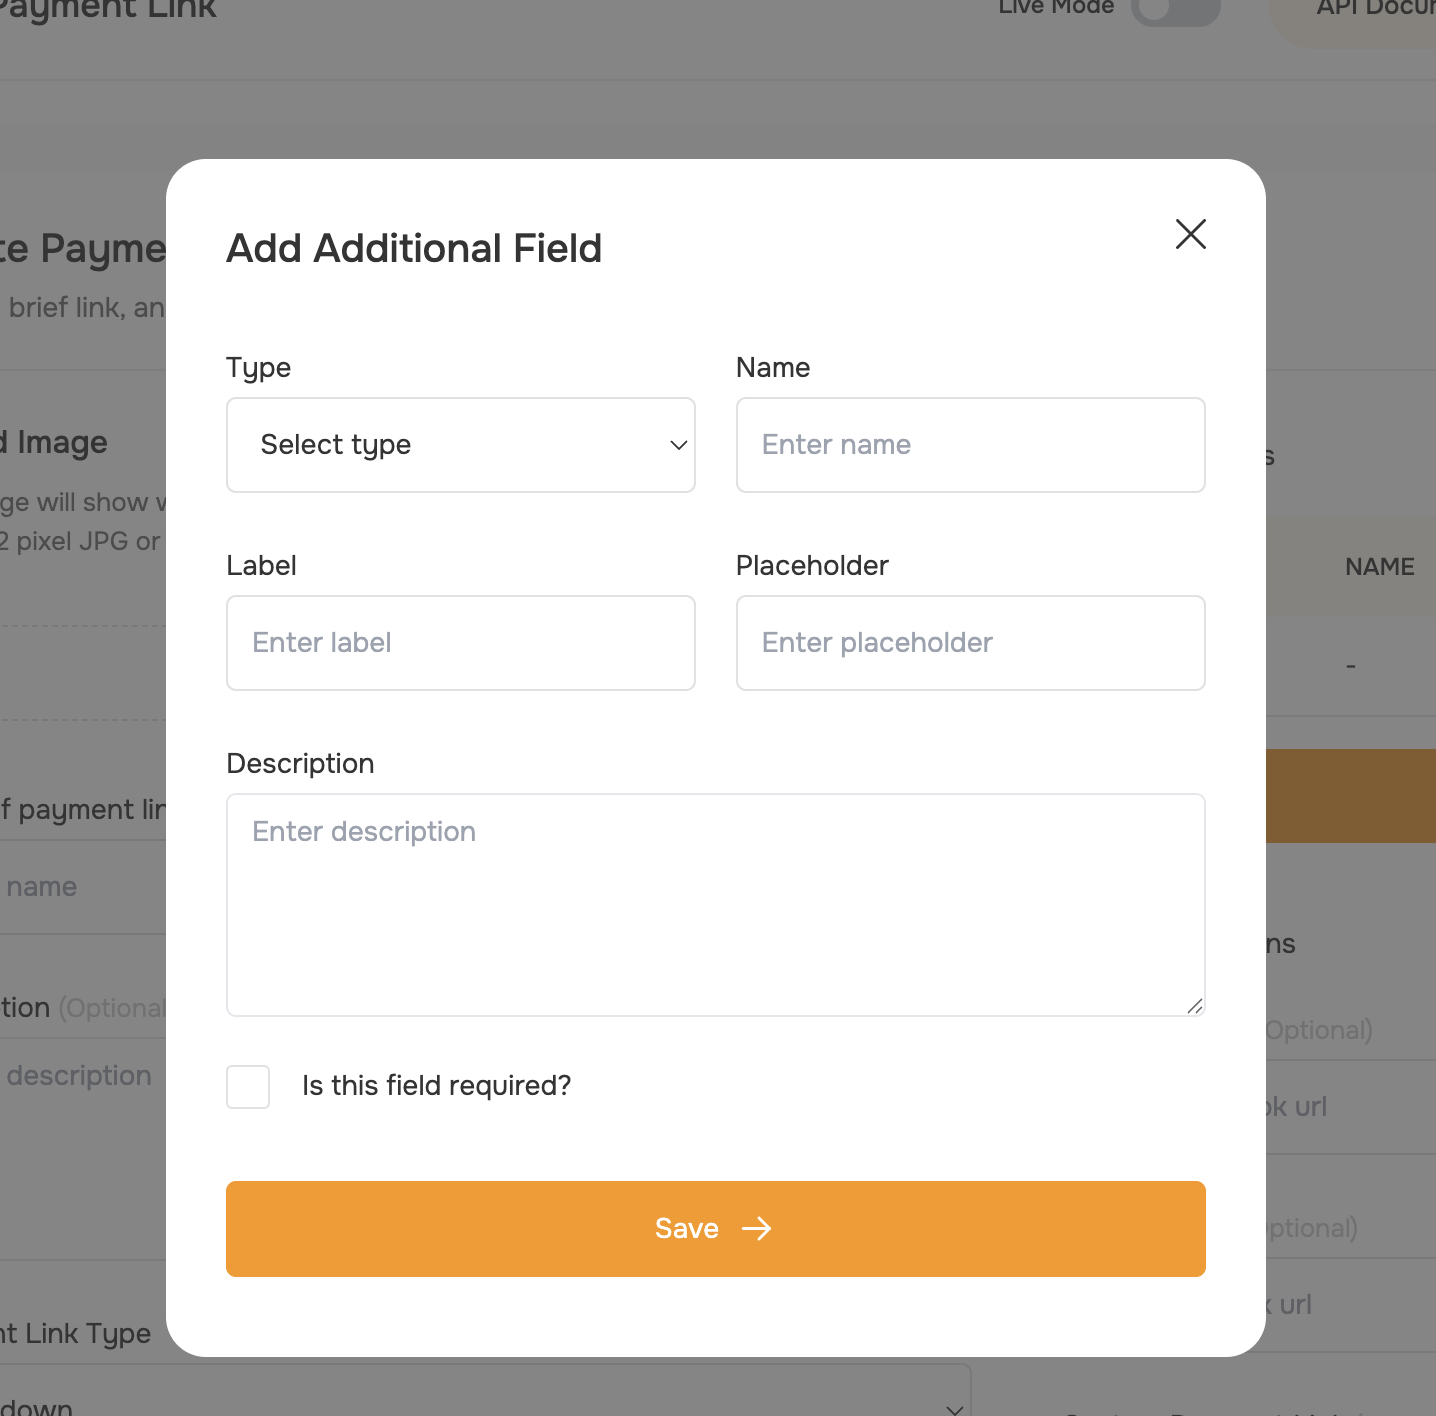 * A dropdown appears where you can select the Type of field:
* input (text, email, number, etc.)
* select (dropdown; if selected, you can add multiple options with label, value, and description)
* checkbox
* A dropdown appears where you can select the Type of field:
* input (text, email, number, etc.)
* select (dropdown; if selected, you can add multiple options with label, value, and description)
* checkbox
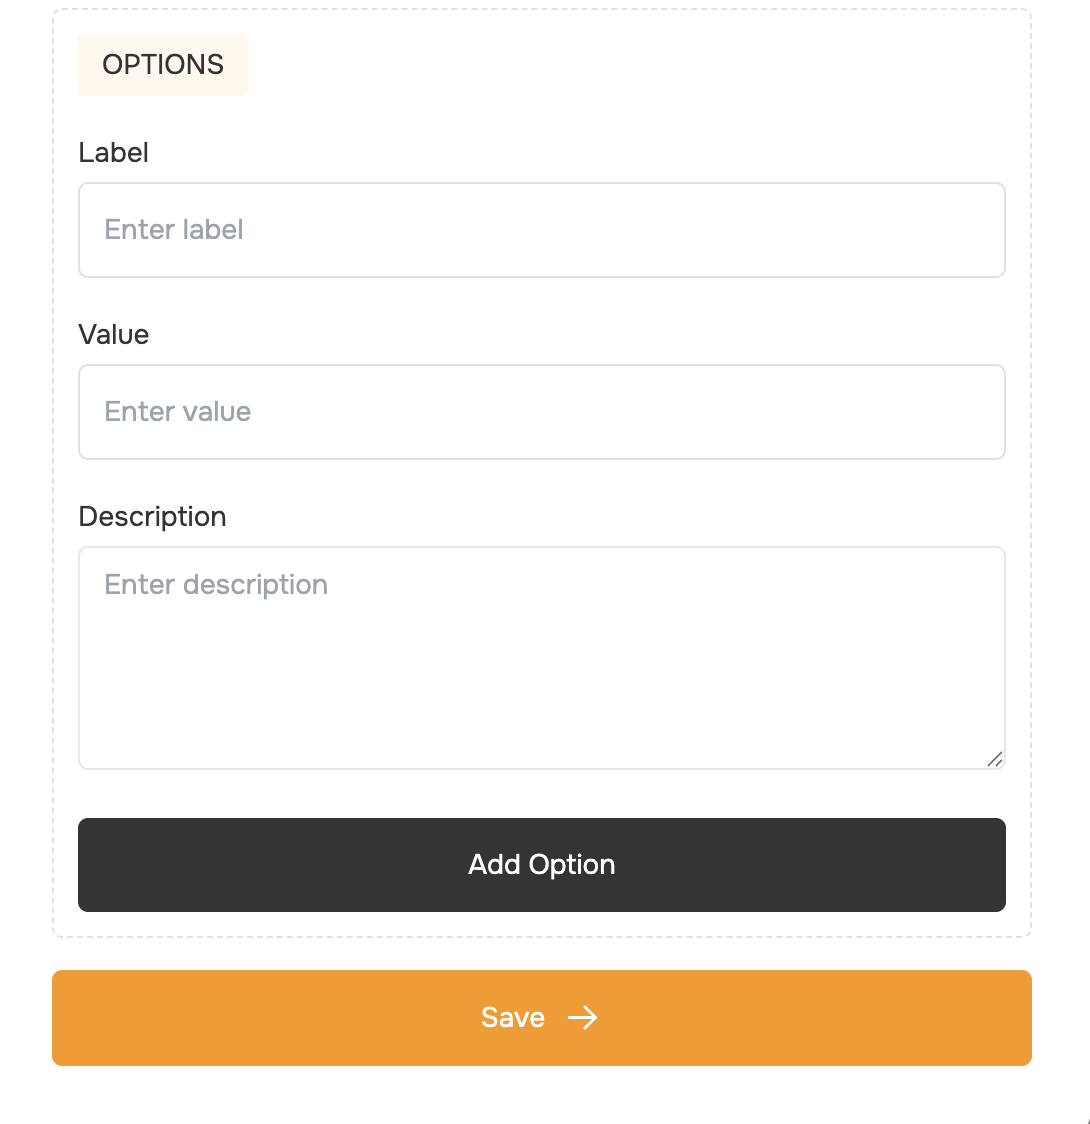 * Name: Internal identifier for the field
* Label: What the customer sees on the form
* Placeholder: Example or hint text inside the field
* Description: Additional help text for the customer
* Is this field required?: Checkbox to make the field mandatory
* Click Save to add the field. You can add as many additional fields as needed.
**Example additional fields:**
* Customer name: type="input", name="customer\_name", label="Full Name"
* Phone number: type="input", name="phone", label="Phone Number"
* Email address: type="input", name="email", label="Email Address"
* Delivery method: type="select", name="delivery\_method", label="Delivery Method", options=\["Pickup", "Home Delivery"]
Choose who bears the payment processing charges:
* Name: Internal identifier for the field
* Label: What the customer sees on the form
* Placeholder: Example or hint text inside the field
* Description: Additional help text for the customer
* Is this field required?: Checkbox to make the field mandatory
* Click Save to add the field. You can add as many additional fields as needed.
**Example additional fields:**
* Customer name: type="input", name="customer\_name", label="Full Name"
* Phone number: type="input", name="phone", label="Phone Number"
* Email address: type="input", name="email", label="Email Address"
* Delivery method: type="select", name="delivery\_method", label="Delivery Method", options=\["Pickup", "Home Delivery"]
Choose who bears the payment processing charges:
- Merchant (Default): You absorb the processing fees. Customer pays exactly the displayed amount. Best for: Transparent pricing
- Customer: Customer pays the processing fees on top of the amount. Best for: When you need to receive the full amount
Determine how many times the link can be used:
- Reusable (Default): Link can be used multiple times. Best for: Ongoing services, subscriptions, or products
- One-time Use: Link becomes invalid after first successful payment. Best for: Invoices, single purchases, or limited offers
- Webhook URL (Optional): Receive real-time payment notifications. Format: Enter your server endpoint URL. Example:
[https://yoursite.com/webhook/payment](https://yoursite.com/webhook/payment)
- Callback URL (Optional): Where to redirect customers after successful payment. Format: Full URL to your thank-you or confirmation page. Example:
[https://yoursite.com/thank-you](https://yoursite.com/thank-you)
- Custom Payment Link (Optional): Personalize your payment link URL. Base URL:
[https://pay.monieswitch.com](https://pay.monieswitch.com). Add your preferred ending. Example: [https://pay.monieswitch.com/your-custom-link](https://pay.monieswitch.com/your-custom-link)
Use the API to create a payment link. You can specify all the payment details in the request body. Learn more about the API in the [API reference](/api-reference/).
```bash theme={"system"}
curl --location 'https://nini.monieswitch.com/payment-link' \
--header 'Authorization: Bearer {{merchantAPIKey}}' \
--data-raw '{
"amount": 200,
"channel": "API",
"name": "Product Purchase",
"description": "One-time setup fee",
"supportCard": true,
"requiresName": true,
"requiresPhone": true,
"supportBankTransfer": true,
"webhookURL": "https://yoursite.com/webhook/payment",
"callbackURL": "https://yoursite.com/thank-you",
"email":"customer@email.com",
"fields": [
{"type": "text", "name": "customer_name", "label": "Full Name"},
{"type": "tel", "name": "phone", "label": "Phone Number"}
],
"chargeBearer": "merchant",
"reusable": true,
"customLink": "your-custom-link"
}'
```
## Share and Track Payment Links
 When you create a new payment link, you get a sharable link that you can send to
your customers and also track its activities from the view page.
You can embed the payment link on your website or share it on social media, email, or messaging apps.
```html button.html theme={"system"}
```
## Managing Payment Links: Deactivate, Reactivate, and More
You can manage the lifecycle of a payment link from the Dashboard or via API. This includes deactivating, reactivating, editing, viewing, and tracking all related transactions.
When you create a new payment link, you get a sharable link that you can send to
your customers and also track its activities from the view page.
You can embed the payment link on your website or share it on social media, email, or messaging apps.
```html button.html theme={"system"}
```
## Managing Payment Links: Deactivate, Reactivate, and More
You can manage the lifecycle of a payment link from the Dashboard or via API. This includes deactivating, reactivating, editing, viewing, and tracking all related transactions.
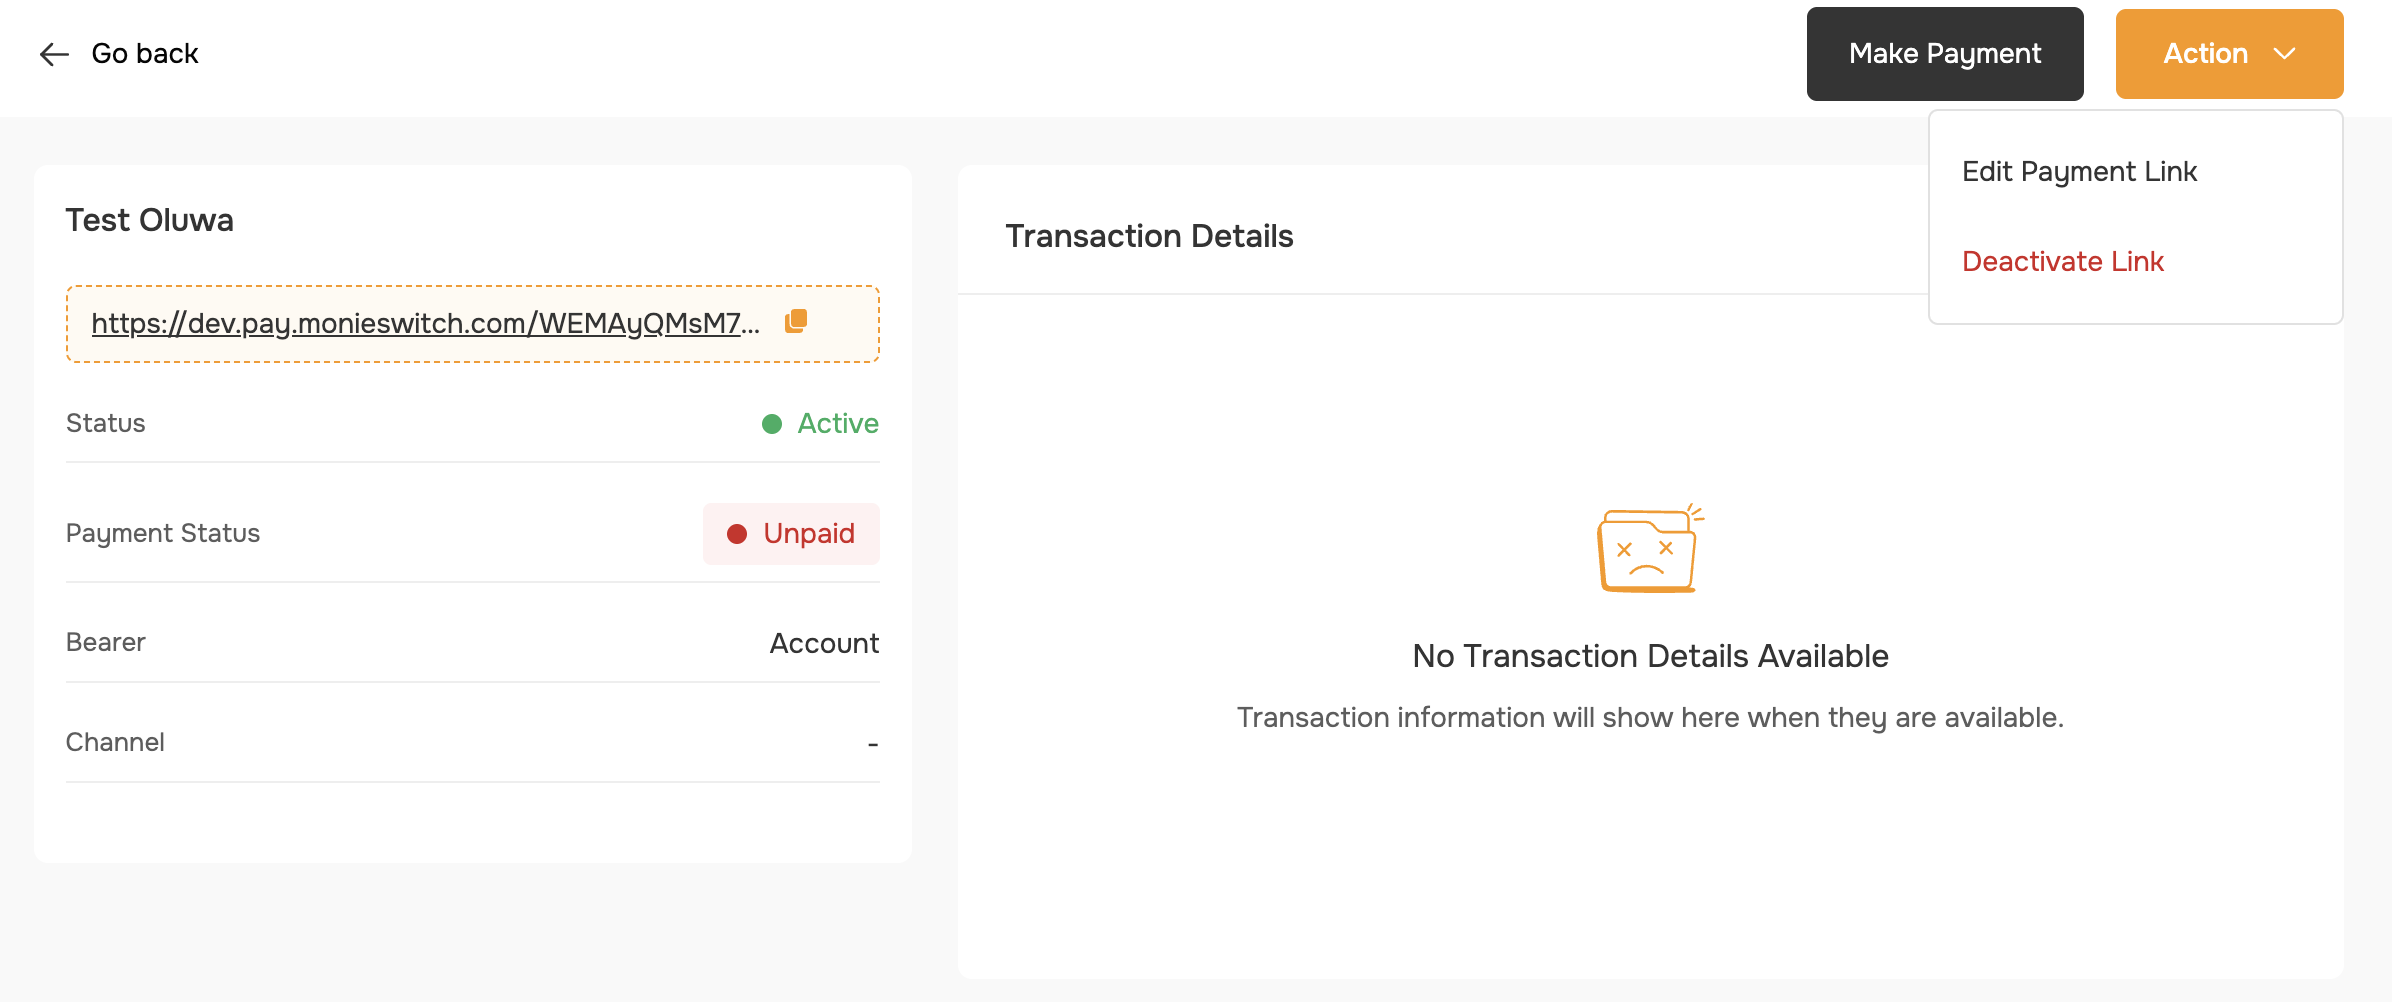 Use the action button on the payment link to deactivate it. Once deactivated, customers can no longer make payments with that link. You can reactivate the link at any time from the same menu.
View the payment link's status, details, and all associated transactions in one place.
Update the payment link's name, description, or additional fields as needed.
Use the payment link to initiate a payment and verify the flow.
See a list of all transactions made through the payment link, including status and details.
Use the API to deactivate a payment link. Learn more in the [API reference](/api-reference/).
```bash theme={"system"}
curl --location --request DELETE 'https://nini.monieswitch.com/payment-link?paymentLinkID={ID}' \
--header 'Authorization: Bearer {{merchantAPIKey}}' \
--data ''
```
```bash theme={"system"}
curl --location --request PATCH 'https://nini.monieswitch.com/payment-link/activate' \
--header 'Authorization: Bearer {{merchantAPIKey}}' \
--data '{
"paymentLinkID": "{ID}"
}'
```
## Best Practices
For Better Conversion
Use the action button on the payment link to deactivate it. Once deactivated, customers can no longer make payments with that link. You can reactivate the link at any time from the same menu.
View the payment link's status, details, and all associated transactions in one place.
Update the payment link's name, description, or additional fields as needed.
Use the payment link to initiate a payment and verify the flow.
See a list of all transactions made through the payment link, including status and details.
Use the API to deactivate a payment link. Learn more in the [API reference](/api-reference/).
```bash theme={"system"}
curl --location --request DELETE 'https://nini.monieswitch.com/payment-link?paymentLinkID={ID}' \
--header 'Authorization: Bearer {{merchantAPIKey}}' \
--data ''
```
```bash theme={"system"}
curl --location --request PATCH 'https://nini.monieswitch.com/payment-link/activate' \
--header 'Authorization: Bearer {{merchantAPIKey}}' \
--data '{
"paymentLinkID": "{ID}"
}'
```
## Best Practices
For Better Conversion
- Use clear, descriptive names that immediately tell customers what they're
paying for - Add relevant images to build trust and recognition - Write helpful
descriptions that eliminate confusion - Choose appropriate link types based on
your business model
For Better Management
- Use consistent naming conventions for easy organization - Set up webhooks
for automatic payment tracking - Configure callback URLs for better customer experience
* Test links thoroughly before sharing with customers
Security Considerations
- Use HTTPS URLs for webhooks and callbacks - Validate webhook signatures
on your server - Don't share sensitive information in link names or descriptions
* Monitor link usage regularly for suspicious activity
## Common Use Cases
### E-commerce
* Type: Fixed or Dropdown
* Additional fields: Customer name, shipping address
* Callback: Order confirmation page
### Services
* Type: Fixed or Input
* Additional fields: Project details, contact information
* Webhook: Update project management system
### Donations
* Type: Custom
* Additional fields: Donor name, message
* Callback: Thank you page with donation receipt
### Subscriptions
* Type: Fixed
* Reusability: Reusable
* Additional fields: Account email, subscription preferences
## Troubleshooting
Common Issues
- Image not displaying: Check file size (under 1MB) and format (JPG/PNG)
* Link not working: Verify all required fields are completed -
Webhook not firing:
Ensure URL is accessible and returns 200 status -
Customers confused:
Add clearer descriptions and appropriate additional fields
Testing Your Link
1. Create a test link with a small amount 2. Complete a test transaction 3.
Verify webhook notifications (if configured) 4. Check callback URL redirection
2. Confirm additional field data collection
## Final Steps
After configuring all settings:
1. Review all information for accuracy
2. Test the payment flow
3. Share the link with customers
4. Monitor payments and adjust settings as needed
Your payment link is now ready to accept payments from customers worldwide!