> ## Documentation Index
> Fetch the complete documentation index at: https://docs.monieswitch.com/llms.txt
> Use this file to discover all available pages before exploring further.
# Virtual accounts
> Learn how to use virtual to easily collect payments from your customers
Virtual accounts provide a straightforward, efficient, and flexible method for accepting bank transfer payments. This solution eliminates the need for complicated integrations or a dedicated website, making it accessible to businesses of all sizes and technical capabilities.
This guide will walk you through everything you need to know about using virtual accounts effectively.
## What are Virtual Accounts?
Virtual accounts are temporary digital bank account details (account number and bank name) that allow you to receive payments via bank transfer.
They function like regular bank accounts but are managed through Monieswitch Checkout and have a limited lifespan.
### Key Features
* Available for Nigerian Naira (NGN) transactions
* Can be created through our dashboard or via API
* Allow customers to pay you using familiar bank transfer methods
* Temporary nature: accounts have a configurable lifespan
Note: All virtual accounts are temporary. The lifespan can be configured, but
after this time, the account will no longer be available for receiving
payments.
### Handling Expired Accounts
When a virtual account expires:
* The account immediately stops accepting payments
* Any attempted transfers will be rejected by our system
* You could also have a system in place to handle these rejected payments (e.g., notifying the customer, offering alternative payment methods) through our webhooks.
## How Virtual Accounts Work
* Navigate to the dashboard
* Click on "Virtual Accounts" in the main menu
* Select the "Create Virtual Account" button
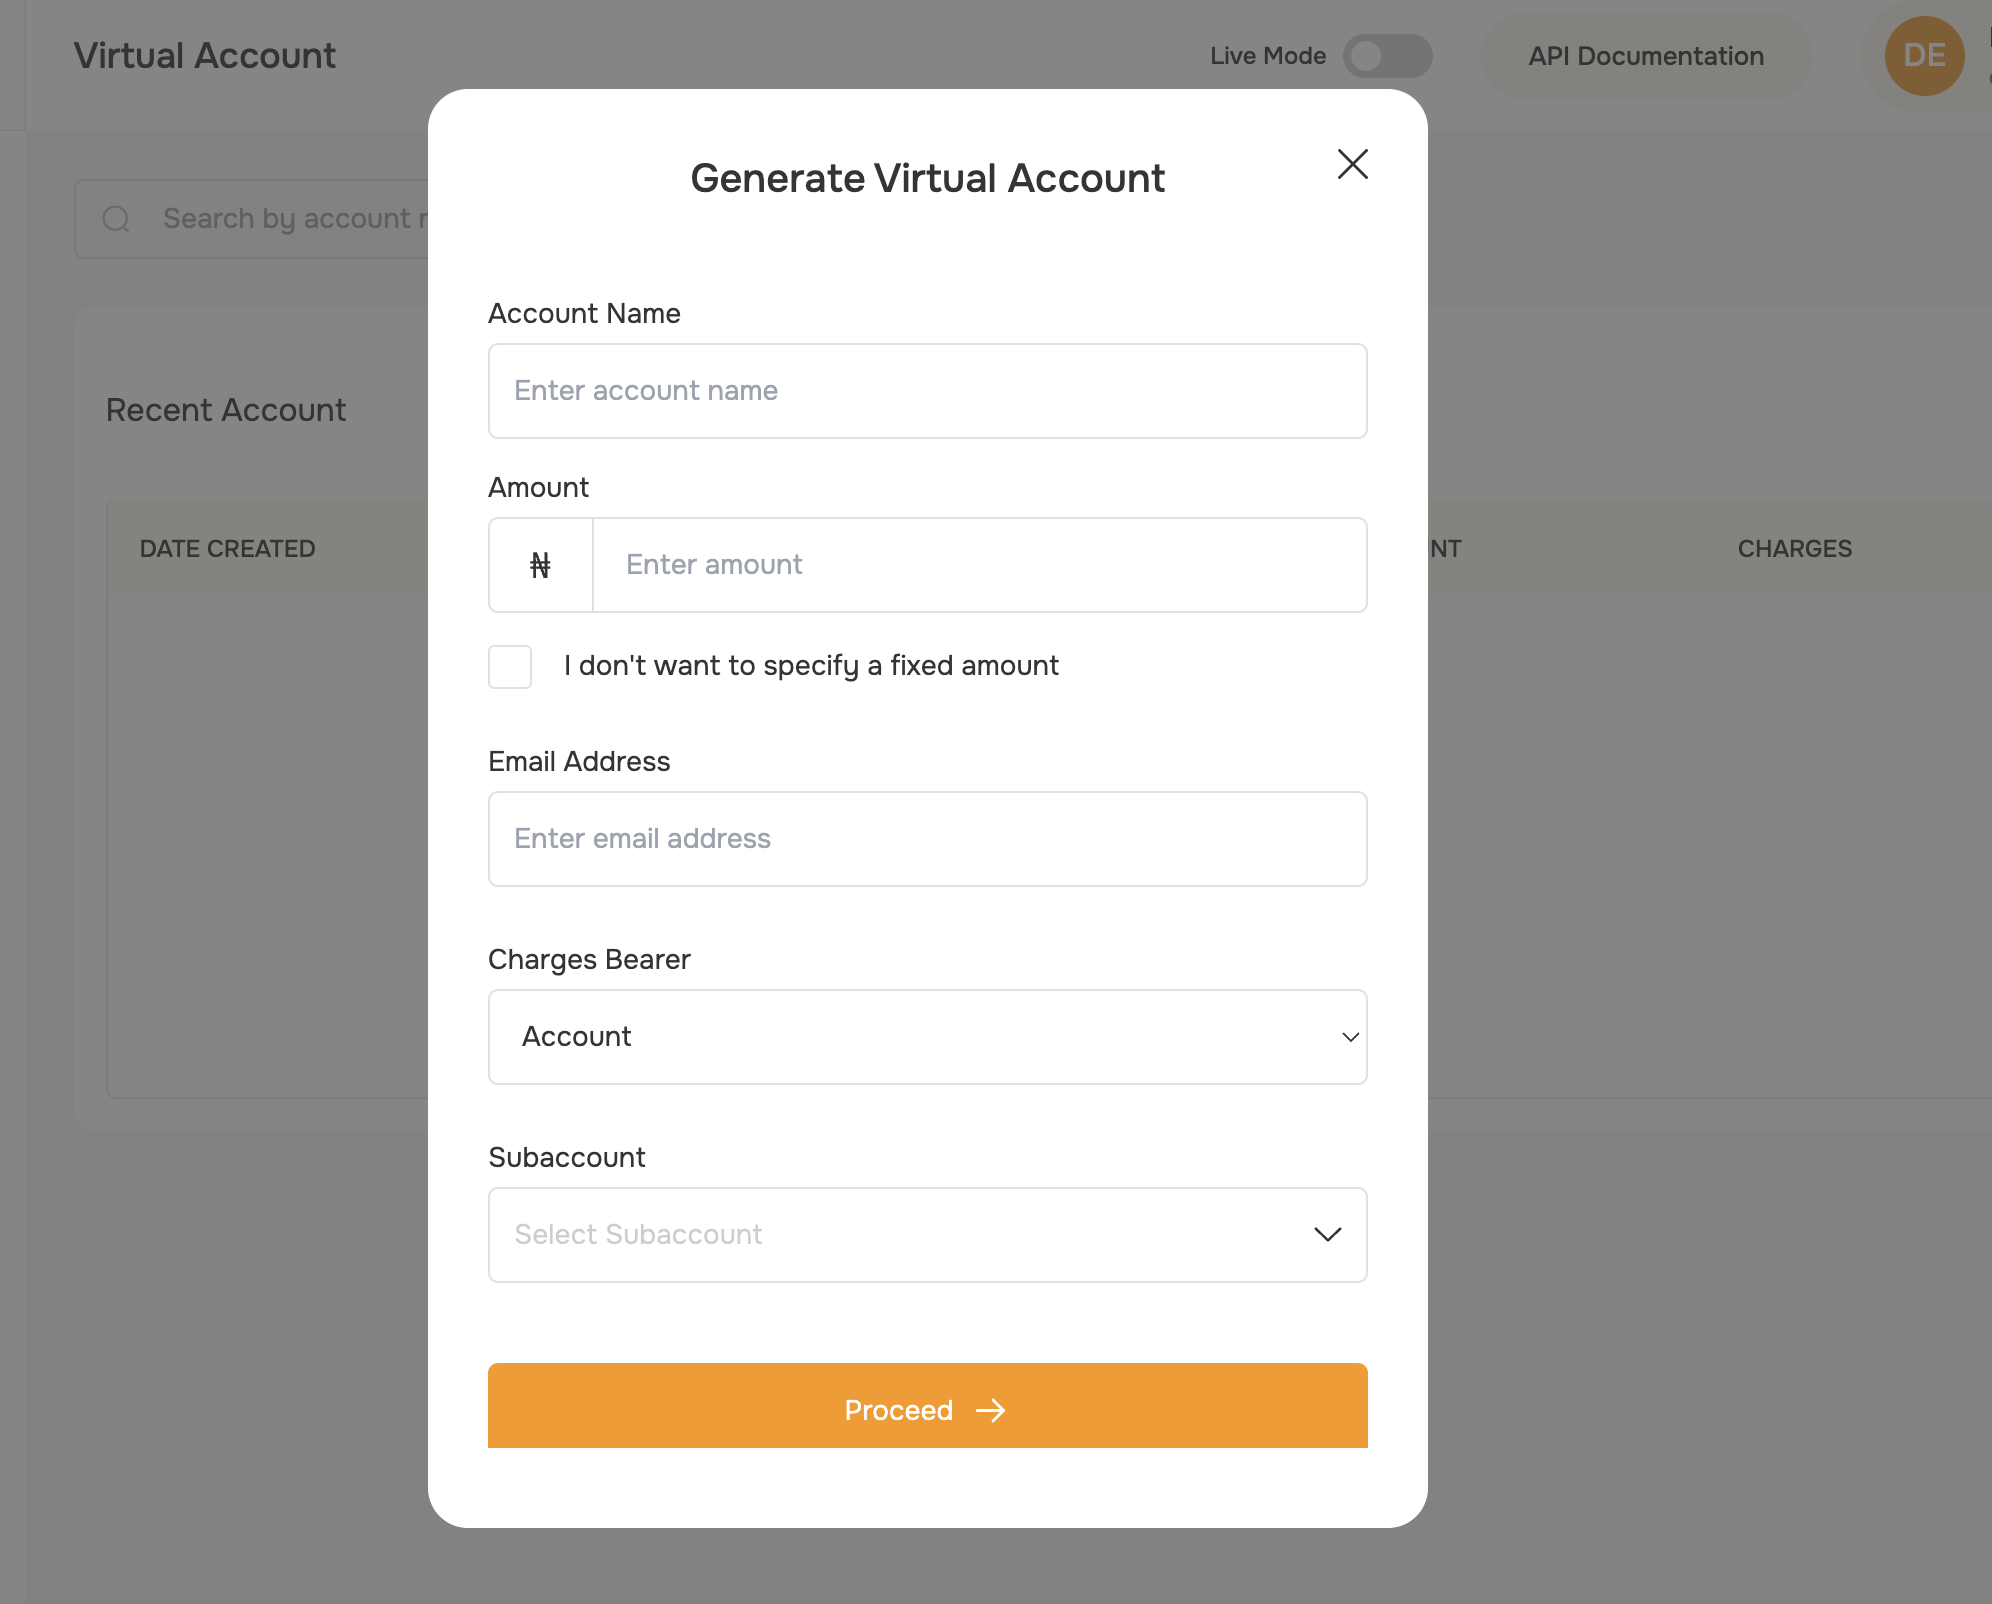 In the modal that appears, fill out the following fields:
* **Account Name:** Enter a name for the virtual account (for your reference or to show the payer).
* **Amount:** Enter the amount to be paid. If you want the payer to enter any amount, enable the checkbox "I don't specify a fixed amount"—the amount field will disappear.
* **Email Address:** Enter the payer's email address (for notifications or receipts).
* **Charge Bearer:** Select who will bear the transaction charges: customer, merchant, or subaccount.
* **Subaccount:** If you select subaccount as the charge bearer, choose the specific subaccount from your list.
- The amount field is only visible if you want to specify a fixed amount.
- If you select subaccount as the charge bearer, you must select which subaccount will bear the fee.
Upon successful submission:
* Your virtual account details will be generated
* A usage timer will be displayed
* The account is now ready for transactions
In the modal that appears, fill out the following fields:
* **Account Name:** Enter a name for the virtual account (for your reference or to show the payer).
* **Amount:** Enter the amount to be paid. If you want the payer to enter any amount, enable the checkbox "I don't specify a fixed amount"—the amount field will disappear.
* **Email Address:** Enter the payer's email address (for notifications or receipts).
* **Charge Bearer:** Select who will bear the transaction charges: customer, merchant, or subaccount.
* **Subaccount:** If you select subaccount as the charge bearer, choose the specific subaccount from your list.
- The amount field is only visible if you want to specify a fixed amount.
- If you select subaccount as the charge bearer, you must select which subaccount will bear the fee.
Upon successful submission:
* Your virtual account details will be generated
* A usage timer will be displayed
* The account is now ready for transactions
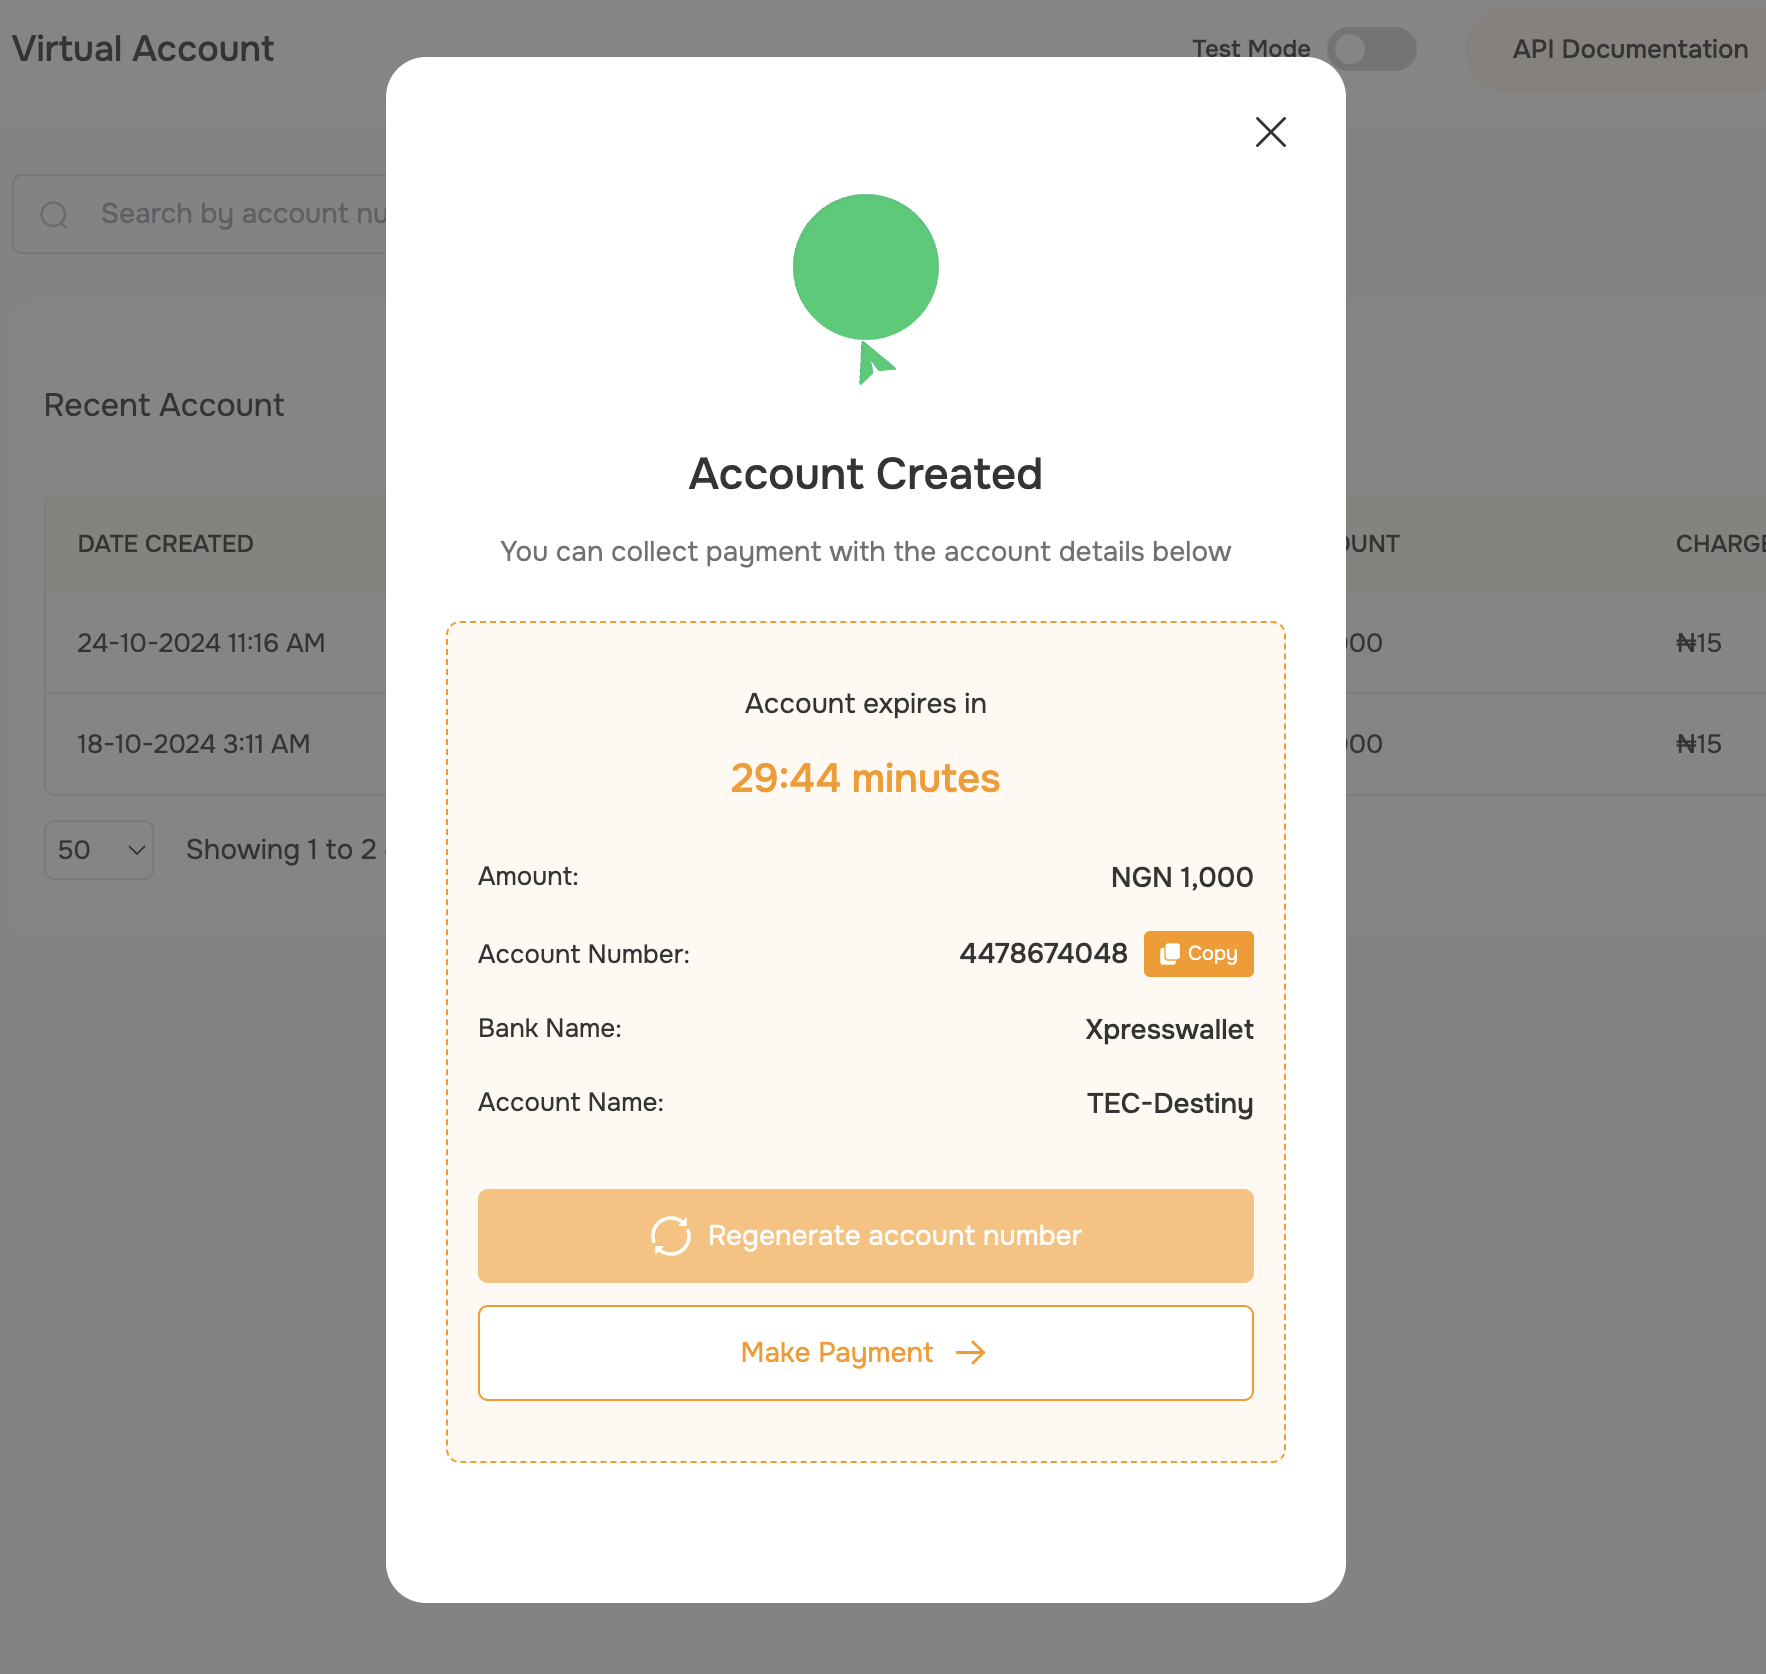 The timer indicates the duration of account validity and when its elapses, a regeneration can be requests while on the screen
Use the API to create a virtual account. You can specify the details in the request body. Learn more about the API in the \[API reference.
```bash theme={"system"}
curl --request POST \
--url `https://${BASE_URL}/v1/virtual-accounts` \
--header 'Content-Type: application/json' \
--data '{
"accountName": "Omar Marmoush",
"amount": 200,
"metadata": {
"reason": "testing"
},
}
```
If selecting subaccount, you'll need to choose from your existing subaccounts.
The timer indicates the duration of account validity and when its elapses, a regeneration can be requests while on the screen
Use the API to create a virtual account. You can specify the details in the request body. Learn more about the API in the \[API reference.
```bash theme={"system"}
curl --request POST \
--url `https://${BASE_URL}/v1/virtual-accounts` \
--header 'Content-Type: application/json' \
--data '{
"accountName": "Omar Marmoush",
"amount": 200,
"metadata": {
"reason": "testing"
},
}
```
If selecting subaccount, you'll need to choose from your existing subaccounts.